 |
||
| We work closely with the educator community to provide a library of lesson plans that can help apply Minecraft: Education Edition to a variety of teaching and curriculum needs. These lesson plans are available in the Class Resources area of the website, and we’ll continue to add more in the months ahead.
Creating Lessons Creating a lesson in Minecraft: Education Edition is not complicated, but it does require some planning. You probably have experience creating lesson plans for your students, now it is time to bring them to life in Minecraft: Education Edition. The ability to submit lessons is reserved for Minecraft Global mentors. You can learn more about becoming a mentor here. Here is a checklist of things you’ll need to create your lesson.
There are several locations available to create a lesson, but we will be using the most common: the dashboard method. To reach your dashboard, log in to the website and visit the “Classroom” tab.
Select the “Create New Lesson” option. |
||
| Bonus: Minecraft: EE__ Lesson Plan Template
Photo We provide a few standard photos, but the best way to make your lesson stand out to others is to provide a screenshot within your Minecraft-based (or adapted for Minecraft) lesson world.
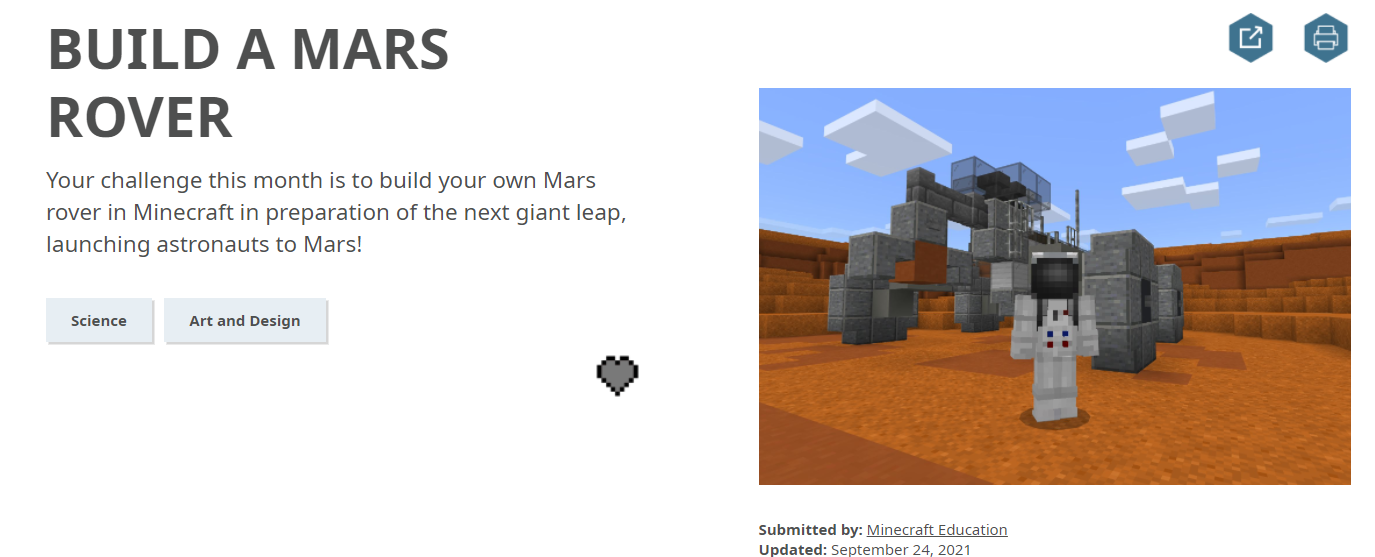
Image via Build A Mars Rover – By: Minecraft Education Edition Tips to try
Image via International Space Station – By: Minecraft Education Edition Things to avoid
Title: 80 Character Limit. Creating a good title for your lesson makes the difference between lessons that are seen often, and lessons that are hard to find by other educators. They should be specific, easy to understand, and simple. Short Description: 100 Character Limit. The description field is kept deliberately short but should not just be the first part of your introduction repeated. It is only seen one time so first impressions are important. Tips to try
Things to avoid
Introduction: 200 Character Limit. Think of this area as a longer description, designed for people who have already clicked through to view your lesson. You can make a reinforcing statement about your lesson (like in “Climate Change”) or go in depth to elaborate your original short description, for example: Short description: Explore and create stories in The Baddlands Introduction: Students can explore the rich story setting and use it as a platform on which to build and develop their own characters, settings, and events. (example from: The Baddlands, Simon Baddeley)
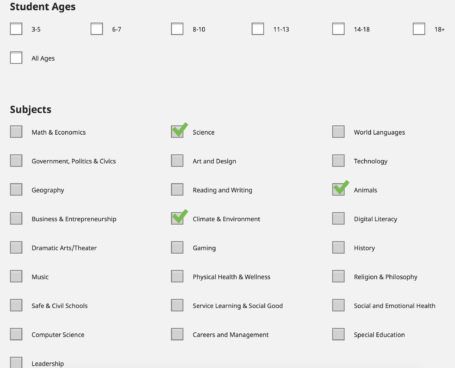
Student Ages You can click more than one box here, but if you find yourself checking all the boxes, perhaps consider using “all ages” instead. Subjects You can select up to a maximum of three subject areas. Skills You can select up to a maximum of three skill areas. Experience Level: You can select an approximate difficulty level of your lesson plan for an instructor to teach. Estimated Time: You can select the average time to complete the lesson plan.
Lesson Language This drop-down defaults to English, but we accept lessons in other languages. Learning Objectives A well-defined learning objective defines the rest of the activity. You can add as many as you need by using + ADD LEARNING OBJECTIVE. They will show up as a bullet point list in your lesson. Note that you are limited to 500 Characters. Teacher Prep & Notes: Here you can give teachers and educators a high-level overview of the lesson plan and curriculum, as well as give detailed preparation notes to better organize the lesson. Note that you are limited to 10,000 characters. Guiding Ideas and Questions Providing guiding ideas and questions helps provide context for the lesson, and occasionally can provide suggestions for other educators using your lesson. Note that you are limited to 10,000 characters. Student Activities This section is designed to outline the exact steps needed by students to meet the learning objectives. Student Activities should also demonstrate or suggest how to use Minecraft to achieve these objectives, and often refer to the supporting files area on the right side of the lesson when published. Note you are limited to 10,000 characters.
Performance Expectations
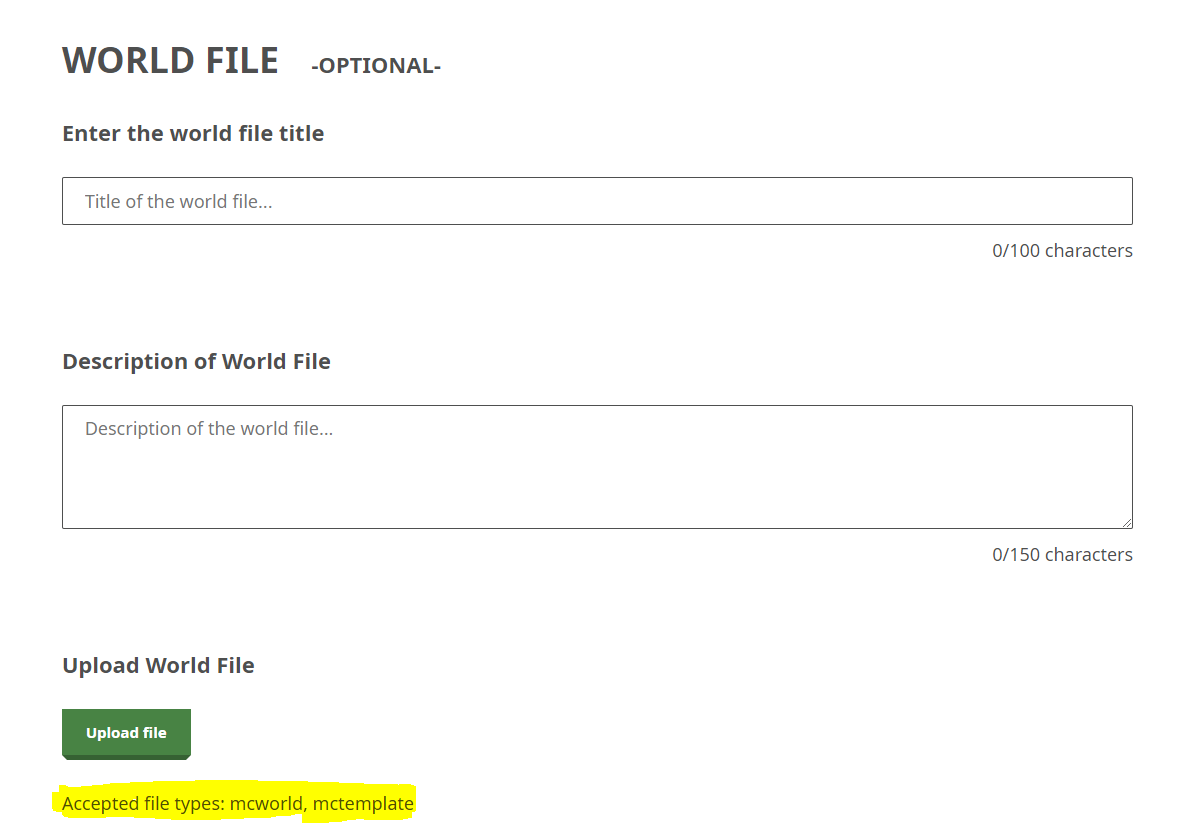
Note: Each of these sections provide you with a rich text editor (so you can paste in your lesson from your word processor), and 3000 characters. External References If you have websites or videos that support your lesson, these would be a good place to link those. Please be careful linking to external resources you did not create, as content may change without notice. Supporting Files This is where you upload things like .mcworlds (these should be placed in ZIP files), PDFs, and documents. Be sure to describe all of them clearly with filenames that are distinct. Adding An MCWorld File & Resources Here you can add your Minecraft World File (MCworld File) as well as external resources like YouTube videos or webpage links.
Congratulations, your lesson is now complete! What’s next? Save as Draft If you don’t have time to finish your lesson, please save it as a draft and come back to it later. If for any reason you are not finished and have trouble editing, let our team know. Submit for Review Once a lesson is submitted, it goes through two steps by our community team.
General Tips
We are always looking at ways to improve the lesson submission process, and as educators, your input is valuable to us. Please post your feedback in the product feedback section of the website, or send it to support. Either way, we look forward to hearing from you and seeing your community contributions soon. Thank you for supporting Minecraft: Education Edition! |
||


Related Posts

Joining Link – Live Session on MINECRAFT activities 25 June 2023
Minecraft Education – Activities in the Minecraft World Date : 25th June 2023 Time : 1:00pm to 3:00pm MS Teams Event Joining Link : https://bit.ly/Minecraft25June2023 Regards Team AZCCare Microsoft Partner in Education support@azccare.com
Steps to Import and Export world in M:EE
Steps to Import Minecraft: Education Edition World: Open Minecraft Education Edition Sign in with your IDs Click on Play Button Click on Import button and import the world in Minecraft: Education Edition Click View my Worlds Now Imported world is Visible, select that World and Play After building the world based on the Current Monthly […]
Minecraft Monthly Challenge: March 2022
Build A Molecule Your challenge this month is to build a molecule in this chemistry themed world and learn about its form and structure. Use the space inside the dome to build in a 3D environment, create different atoms and molecules, or go through a variety of pre-build molecules and try to identify all of […]